
Flash is a devisive topic in street photography and yet it isn’t so in other forms of photography. For some people it provides a highly desirable aesthetic and opens possibilities that wouldn’t exist otherwise. For other photographers, it is an aggressive intimidating act that destroys candid moments. Personally, I view it with the potential to be both depending on how it is used. As I always want to expand my horizons, I decided to experiment with the Fuji EF-X20 in street photography so that I’d have more options. After a couple of months having owned the EF-X20 and having written an initial impressions post back then. Here are some insights I’ve gained.
My tl;dr is that it is a great compact flash for street photography and it can be used in some different situations like portraits, though it isn’t ideally suited to them. I’d recommend you check it out.
Not sure how to use flash for street photography?
New to flash street photography? Sign up with the street photography academy for free and get this flash street photography guide for free too! Plus many more great resources. Win win win.
Join Now
A Guide number of 20…and 12
The EF-X20 has, in effect two guide numbers. 20 (hence the name) and 12. You only get 12 when you use the diffuser that is built in (more later). The guide number is the strength of the flash but it also tells you a lot more than just the strength of the flash. It can help you work out what other settings you should use.
Here’s where things get a little mathematical. If you don’t want to ever do any maths like this then you’ll want to use TTL mode, that automatically works out what settings to use your flash. The only issue with this is you need your flash connected to your camera as the camera will do some of the smarts for you. There are some workarounds like using a flash sync cable or a wireless flash trigger with TTL support.
Even if you want to use a flash with TTL, it’s still a good idea to learn the basics of Guide number maths as it can help you take control of the lighting and trouble shoot any issues you have.
You can adjust the power of the flash via the control dial on top. At it’s brightest, the flash will shock someone on a dark night. However, if you reduce the flash to 1/16, it doesn’t make a very startling flash at all, this allows you be relatively un-noticed and yet still get that flash look. You will probably need to raise your ISO settings though to help get a clean image.
Guide number maths
The important formula for Guide numbers is
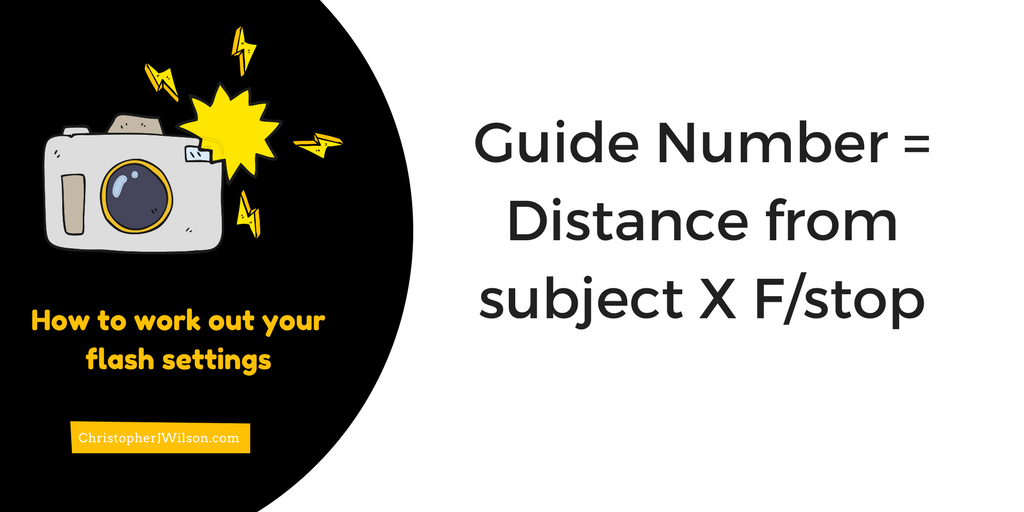
Guide Number = Distance from subject X Fstop (at ISO 100)
So if you have two of these values, you can work out the other value you want. Set your camera at f/8 and know your subject is 10 meters away, you need a guide number of 80 (at ISO 100). BUT if you subject is twice as far, or you want to shoot at f/16, you’ll need a guide number of 160.
With our Fuji EF-X20 and Fuji X100t (which has a low ISO of 200), we have a guide number of 20. That means at F/4, things are fine up to 10 meters. At F/8, we only have up to 5 meters, at f/16 only 1.25 meters. We can get further range by opening up our lens or raising our ISO value (our shutter speed won’t affect the flash remember).
So when you are shooting on the street (especially at night), if you can pre focus and pre set your flash and camera for a certain distance, you are ready to go. It really is the next step in the “zoom with your feet” mentality as, when you have things set up like this, the only way to get the correct exposure is to be at a set distance.
Having said that, you can use TTL, which will adjust the flash settings based on your distance to your subject. This can allow you to use the autofocus (which isn’t that easy at night with little for the autofocus system to work off) or manual focus (which let’s be honest, isn’t easy on the Fuji X100t. At least you can’t rapidly and accurately manual focus). When using the Fujifilm EF-X20 in daylight for fill light, then TTL makes perfect sense, but at night, you might be better off learning how to use it manually. (I hear the latest X-Pro2, x100F and X-T2s have very good autofocus, so perhaps this is easier to use TTL at night.)
The design and build of the Fuji EF-X20
The first thing you’ll notice about the Fuji EF-X20 (a part from its retro vibe) is that it is very well built. While it is not certified waterproof, it is solid and firm (I wouldn’t worry about falling over with it). Despite the resistant metal used to make it, it isn’t very heavy. However, it will upset the balance of your camera a bit if you have it round your neck. Making it a bit more top heavy and making the camera rock forwards or backwards when it is on a strap on your neck.
This all comes in a small package which makes it small enough to put in your pocket and keep with you. When it is on your camera, the whole setup becomes too big to easily put into your coat pocket but it is still small and discrete. The controls are very simple, you have an on/off button on the top, a dial to adjust the power of your flash, a switch on the side to move between wide angle flash and focused mode and a small switch hidden away on the bottom of the flash for switching flash mode.
You also get a little black leather bag and stand with the Fuji EF-X20 that allow you to attach it to a tripod, set it on the side somewhere and put it safely away while you travel around. All together, this provides you with a good small set of tools which you can put in your pocket and go out shooting with for most situations.
The only major feature it is missing is the option to adjust the angle on the flash. It has to point straight forward and straight on. You can’t say, bounce it off the ceiling or direct it against a wall. A pivoting mechanism would have solved this issue but is absent. There is the cheaper and more plasticky and cheaper looking EF-20 which can rotate, or the more expensive and larger EF-x42 and EF-x500 flashes which can bounce.
The different modes of the Fuji EF-X20
The EF-X20 features four different modes. TTL, Manual, Slave N and Slave P.
TTL is through the lens metering where the camera works out the “correct” exposure for you based on your ISO, aperture and focus distance. You can adjust these settings up and down one stop using the controls on top.
Manual involves you manually setting your flash settings using the power setting on top. Here you can select full power, then drop your settings down to a maximum of 6 stops lower (1/64 power). If you understand your guide number and settings, you can really control your flash with this.
Finally there are two slave modes N and P. N is your standard slave mode (where by your flash will fire when it notices another flash firing), P is a slave mode based on Pre firing flashes. I’ve tried both and they both seem to work with the Fujifilm x100t, but I would suspect that it would be more important to use N mode when using high speed flash sync.
To switch mode, move the toggle which is below the flash. X mode is used for TTL or manual. P mode and N mode are selected by choosing P and N.
The EF-X20’s Wide angle diffuser
There is a simple and easy to activate wide angle diffuser built into the ef-x20. This switches the spread of light from 35mm (as standard) to 21mm. It also switches the power down to a guide number of 12 instead of 20. This is useful when using the wide angle lens attachment (or using with a wider angle lens on a different Fuji camera) but also for when shooting off camera and hand held. when the light spreads out more, you don’t have to aim your hand as accurately. Plus a guide number of 12 is more than enough for my settings.
Shooting on camera with the EF-X20
When shooting on camera, set your flash to X mode then clip it into place. This lets your camera speak to the flash and trigger it. It can be used in either TTL or Manual by turning the dial. Turning on the flash requires you to hold down your power button for about 8 seconds. Then you’ll need a little time for it to warm up and be ready to fire. This means you can’t quickly turn your camera on, turn the flash on and fire (I’ve shot this way for a while to save battery power. I’ve missed a few things flying past me but I probably wouldn’t have caught them.) Instead, you have to leave the camera running and flash ready. Goodbye battery power.
A couple more important notes, if you turn the camera off, your flash will turn off as well. You will probably also want to set your function buttons up to help you switch flash modes quicker just in case things go wrong. I’ve set my up arrow key to change the flash settings. This is pretty useful as you cycle the options by pressing up or down and so after a single tap, you’re in the flash menu and your finger is already in place.
As for the actual process of shooting on camera flash. The flash makes the camera slightly more bulky and heavy. It isn’t as easy to fit on a pocket or wrist strap anymore (it’s still much lighter than a DSLR with or without a flash.) The flash can be used to fill in details in bright light, or illuminate objects in little light.
Shooting in Slave mode in hand off-camera with the EF-X20
An alternative option is to use your flash in slave mode in your hand with the Fuji x100t (or other fuji camera with a built in flash) firing its flash in commander mode. This makes your camera fire its inbuilt flash (but not illuminate the scene) and the EF-X20 detects that flash and fires. On a couple of occasions I wondered why I was blowing out my images and then I realised that I was firing my Fuji x100t’s flash and my EF-X20 (I hadn’t set my camera to commander mode).

The advantage of off-camera flash is that you can direct your light to be at a different angle than straight on as the camera views. This means you can illuminate one side of your subject, of get the flash above your subject pointing down. This gives you a different look than just straight on flash.
Unfortunately, this does make you give off some weird looks and posses as you move your hands into better positions. Charlie Kirk once pointed out to me that when you raise both arms in the air, wide apart. It is quite intimidating and looks aggressive. This probably adds to the negative impressions of flash we mentioned earlier. I suspect that many of the reactions you see to flash photography are actually reactions to the photographer moving their arms in such a way.
Personally, I’ve been experimenting more with this style of shooting to try and get some more creative effects. It’s really interesting to see the way that you can light certain aspects of people. In general I’ve used the diffuser built into the EF-X20 to spread the light a bit and make sure that I hit my subject even when I didn’t point my flash dead on. Perhaps this doesn’t make a difference that much but it has felt like it worked. However, you need to be careful when around other photographers using a flash.

Be careful when shooting with others
When I was in Berlin, I attempted some off camera flash with Martin Waltz, It was great to shoot with someone more experienced to build up confidence. However, Martin was using his flash with a wireless flash trigger, I was just using slave mode and in the end, his flash would trigger my flash! I played with covering the sensor or placing my flash behind my back to avoid it firing, but it had some interesting effects on his images and meant I missed a few (as the flash was recharging) and ran out of battery quickly! Since then I’ve grabbed a wireless flash trigger that I need to get round to reviewing.
Shooting TTL off-camera (with a TTL trigger or cable) with the EF-X20
The problem (advantage?) with using slave mode is that you can’t shoot TTL. Instead you have to manually set your settings. This means that if you want to adjust quickly, you’ll probably have to shoot RAW, edit in post and say a little prayer when your subject isn’t the right distance from you. TTL Let’s you camera do some adjusting for you based on the distance, ISO and Aperture you’ve set. There are two options.
The first is a simple flash sync cable (you can use Canon cables) which allows you to use your flash as though it were on top of your camera. Be warned, if your flashes distance is different from then lens, you might need to adjust slightly. If you are shooting off-camera in your hand, then this probably shouldn’t make a difference. But a longer cable might make a bigger difference.
Another option is by using a remote trigger with TTL support. These are pretty limited (most remote triggers only fire in manual mode) but if you can find one with TTL support, you’ll be able to trigger your flash and not have to worry about a pesky wire getting in the way. These do cost a heck of a lot more than a wire, so I’d probably only consider one if you want to use a flash on a stand as well…Or you REALLY love wireless stuff.
Getting creative
Flash isn’t just limited to being on your camera or in your hand in street photography. You can try triggering your flash off camera in slave or even better with a wireless flash trigger. If you pick up a little white umbrella, you can try using it for diffused light. I experimented a bit with shooting my flash into the umbrella and getting my wife to hold it as I took photos. It worked okay, but I wasn’t really in the right place with my settings. First she held the flash in the same hand as the umbrella, but that just lead to overblowing her face. So then I tried holding the flash and shooting it through the umbrella. This worked much better to diffuse the light and create a fun effect.
I’ve also tried taking portraits of my friends using the same umbrella low down and out on the street. It kind of works but it’s not the sort of thing you could easily do in a candid fashion. Still, you could casually set up a light set up with a flash trigger firing your flash into a regular umbrella but it would be difficult to get it set up right. Still, it’s worth a try.
Conclusion
The Fuji EF-X20 is a great small compact flash. It embodies the spirit of creative constraints that are common in street photography and yet it has all the vital features that you need to get started with flash. There may be better flashes out there which are more powerful, or can be bounced, but if you’ve bought into the x100 lines mentality of limits and constraints to boost creativity, it’s worth giving a go.
You’ve got a typo. I think you meant devisive, not decisive. Good article.
Thanks for pointing that out. I’m amazed it’s taken this long for someone to point it out…maybe they thought it was to do with the decisive moment? I guess the way flash freezes a scene, it’s also a decisive topic??? Thanks once again and I’m glad you found it good.
Why does the distance drop from 5m @ f/8 to 1.25m @ f/16 considering the iso stays the same (iso 200)? Regards Antonio
When the aperture changes, it lets in less light. That means you need to be close to get the same amount of light or have more light.
Hi,
thanks for your reply.
I just thought it’s 2.5m.
Silly Question, but i don’t see it addressed anywhere… How does the setting of the flash strength change the guide number? So it’s a 20 at 100% (without defuse), 10 at 1/2?, 5 at 1/4? and so on?
thank you!
No such thing as a silly question (Especially with the inverse square law and lighting) but you are correct. Half power means the guide number is cut in half.